


Critical Failures in Calibrated Dropper Pipettes
Why the Scale (Calibration) is Inaccurate
The accuracy of the printed scale on a dropper pipette is dependent on the strict geometric consistency of the glass tube itself. Any deviation in the pipette's dimensions will render a standardized scale inaccurate.
The primary reasons for inaccuracy are:
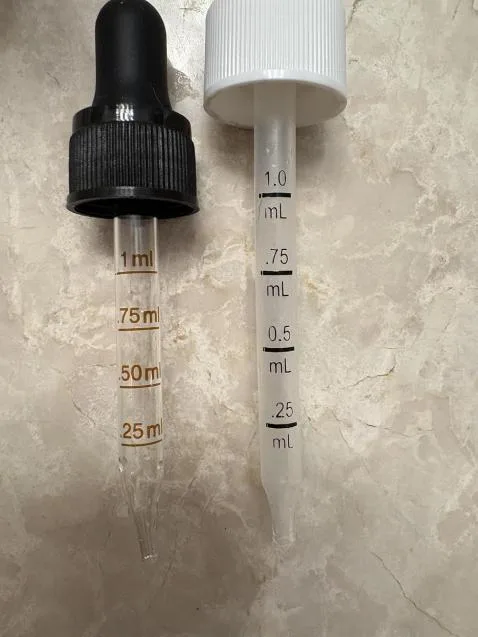
Inconsistent Inner Diameter (Bore): This is the most likely culprit. If the hollow channel inside the glass pipette is wider in some pipettes and narrower in others, a fixed amount of liquid (e.g., 0.5ml) will rise to different heights. A "0.5ml" mark printed at a standard position will be correct for one pipette but wildly inaccurate for another. This is a direct result of poor manufacturing tolerances at the glass-drawing stage.
Variations in Wall Thickness: While less impactful than inner diameter, variations in the thickness of the glass wall can also slightly alter the internal volume, contributing to minor inaccuracies.
Incorrect Printing Calibration: The machinery applying the markings may have been set up incorrectly. The supplier might be using a single, "one-size-fits-all" printing template for different batches of pipettes that have slight dimensional variations, leading to systemic errors.
Parallax Error in Design: The scale was designed without accounting for how the user views the liquid (the meniscus). The marks should be precise, thin lines to minimize ambiguity.
How the Seller Must Avoid This (The QA Protocol)
A reputable supplier prevents these issues by implementing a multi-stage quality control process. The fact that your customer received "loose" scaled pipettes without caps indicates a complete breakdown in the supply chain and assembly process.
Here is the corrective action plan the seller must implement:
Strict Dimensional Control of Raw Pipettes: The seller must demand stricter manufacturing tolerances from their glass pipette source. They should use digital calipers to perform random spot-checks on the inner and outer diameter of incoming pipette shipments to ensure they are within an acceptable range (e.g., ±0.05mm).
Gravimetric Calibration and Verification: This is the industry-standard method for ensuring accuracy.
Process: The QC team takes a random sample of printed pipettes from a production batch. They use a precision analytical scale to weigh a specific volume of a reference liquid (like distilled water, where 1ml = 1g). They draw the liquid up to each mark (e.g., 0.25ml, 0.5ml) and dispense it onto the scale.
Standard: The weight of the dispensed liquid must match the volume indicated on the scale within a very small tolerance (e.g., ±2%). Any batch that fails this test must be rejected.
Mandatory Assembly Verification: Calibrated droppers should always be delivered as a complete, pre-assembled unit (pipette, bulb, and cap). A seller should never ship loose, un-capped pipettes to a brand or contract filler. The fact that this happened is a major red flag. The assembly process is where the final functional fit is confirmed.
Issue a Certificate of Analysis (COA): For products where dosing accuracy is critical (e.g., supplements, CBD, cosmeceuticals), a brand should require the supplier to provide a COA for each batch. This document certifies that the droppers have passed specific QC tests, including the gravimetric calibration verification.
How You (The Brand) Can Confirm Accuracy After Receiving a Shipment
You should not have to be the final line of quality control, but if you have doubts, you can perform the same test a high-quality lab would.
The Gravimetric Verification Method (Simplified for In-House Use)
Equipment Needed:
A high-precision digital scale capable of measuring to at least two decimal places (e.g., 0.01g). These are readily available and affordable.
Distilled water (or a liquid with a known density close to your product). For water, 1 gram = 1 milliliter.
A small, stable container (like a beaker or small plastic cup) to place on the scale.
A sample of the dropper bottles from the batch you received.
Step-by-Step Confirmation Process:
Zero the Scale: Place the empty, clean container on the scale and press the "Tare" or "Zero" button. The scale should read 0.00g.
Draw the Liquid: Take one of your assembled droppers and carefully draw the distilled water up until the bottom of the meniscus (the curve of the liquid) is precisely aligned with the first mark you want to test (e.g., 0.25 ml).
Dispense and Weigh: Carefully dispense the entire contents of the pipette into the container on the scale.
Record the Weight: Read the weight on the scale. If you are testing the 0.25ml mark, the scale should read very close to 0.25g.
Repeat for Each Mark: Empty and zero the container. Now, draw the liquid up to the 0.50 ml mark and repeat the process. The scale should read close to 0.50g. Continue for all other marks (0.75ml, 1.0ml).
Test Multiple Droppers: Repeat this process for at least 5-10 different droppers from the shipment to check for consistency across the batch.


